
KINGSTON IRREGULARS

US Support Teams take up positions in Chain of Command Wargame
Sunday, July 7, 2019
Monday, July 17, 2017
Comparison of Terrain Feature representation in CoC Mini-Campaigns
 |
| Comparison of Terrain Feature representation in CoC Mini-Campaigns |
Friday, February 10, 2017
REPRESENTING SNOW DRIFTS AND SAND DUNES IN CHAIN OF COMMAND
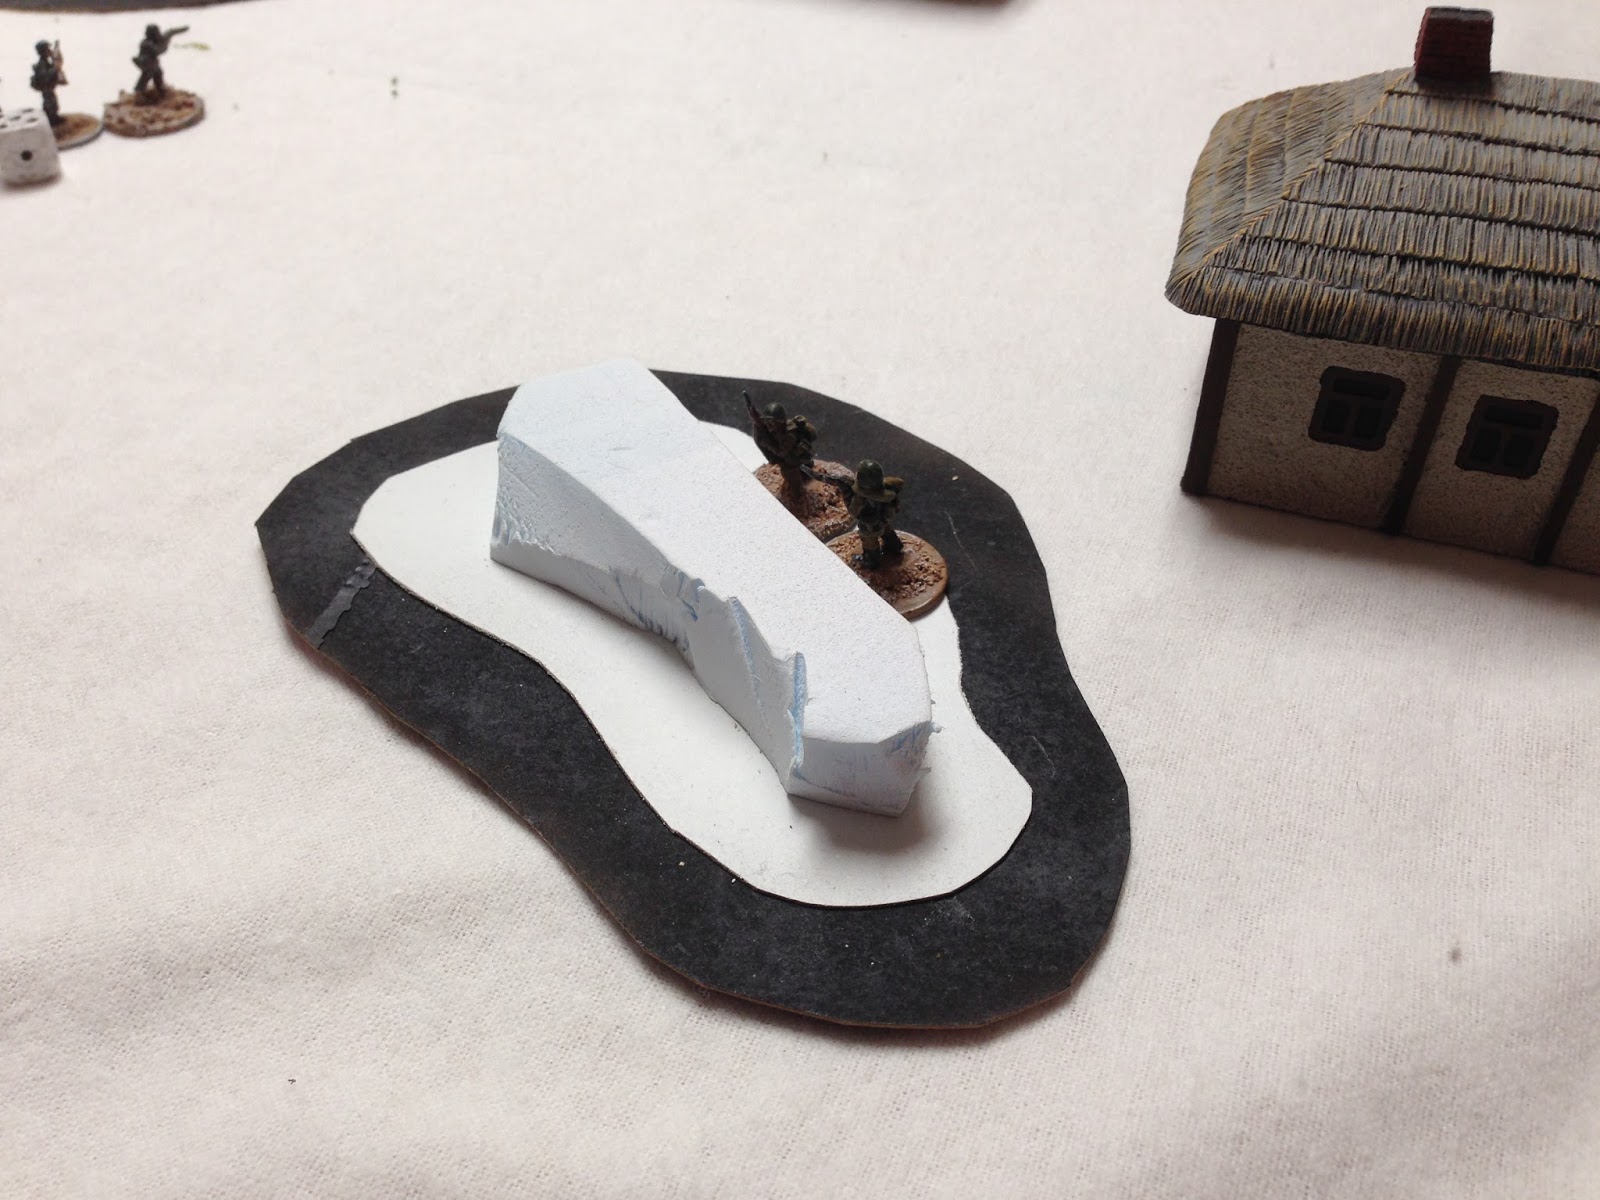
Mitch Abrahms, a regular Chain of Command (CoC) opponent, came up with a great way to represent snow drifts and sand dunes on the table top for CoC. I prevailed on him to write it up for me so I could present it here and on the CoC blog.
Playing a game of Chain of
Command on the Russian Front presents a full gamut of gaming experiences. In models there are the Russians and Germans
but also a host of German allies. In
armored vehicles there is a choice of Early War AFVs with little armor, there
are Russian heavies and everything in between.
Various infantry formations are represented, from conscript hard pressed
soldiers to elite and guard formations on both sides.
Playing in 15mm allows the
game to give a perfect blend of soldiers in the field to space on the
table. The WOW factor of 25/28mm is
lessened but distance is enhanced. To me
that is an equal trade-off. That is the
great thing about our hobby. There is
something for everyone.
From the rolling steppes of
the Ukraine to the cities of Rostov and Stalingrad, the Russian Front allows
gamers the ability to recreate those situations which allow the historical
books to come to life and perhaps give some additional understanding of the
challenges and concerns the real
combatants had to overcome. To do that the game master not only needs the
forces (our soldiers and vehicles) but also model the terrain which is
essential in giving the full experience some amount of justice.
When I first started playing
in “Russia” I gathered together the normal things one would need. First was a ground-cloth – initially I used
what I had and used a green one. But the
experience was lacking for the players.
They felt that if it was Russia, it had to be white so I invested in a
white ground-cloth. Next were
roads. I made the poor, dirt roads with
water frozen on them. After all, it was
winter (look outside – there’s snow [a white ground-cloth]. Everyone knows that Mother Russia is so
expansive that the road network is poor and in mud they freeze solid.
I bought buildings which were
transformed into a small village. Add
those together and dozens of configurations can be made. Next I made winter trees and followed this up
with two different types of broken ground.
I had objectives to take and the pristine snow now had broken ground
along the pathway allowing attackers a realistic means of reaching the
objectives.
The big failing was
vehicles. With the ground so flat and
vehicles able to be fired at over broken ground, fields, and the “snow”, there
appeared to be something missing. I had
tried hills but they always gave the same result; they were too large and too
consuming. The focal point always
shifted to the hills. Additionally, this
wasn’t realistic. There were no hills
where this fighting had taken place historically. Perhaps folds in the terrain but no
overpowering hills. What would give me
the type of table I wanted and still give players choices on routes of
movement. Looking for a long time at the table it seemed to hit on me that what
was missing was snow drifts.
My first snow drifts were
made out of Blue Foam. Small pieces which a tank could be placed next to in
order to appear hull defilade. Looked
fine – played poorly. Too many questions
popped up about what could and could not be fired at or fired into. After a couple of weeks of trying different
ideas I settled on the following and it appears to work fine. There is a piece of Blue Foam Board
sculptured into different shapes but all approximating what a snow drift would
look like. Under that, with the same
shape as the Blue Foam (which btw is painted white) is white construction
paper. Under that, and larger still, by
a lot, is black construction paper. So,
it is a three part structure: Blue or
Pink Foam, White Construction Paper and then Black Construction Paper.
Here are the rules. If you are on the Black and fire goes through
the Blue Foam you cannot be seen as you are hidden by the snow drift. As in most miniature rules, if you cannot be
fired on, you cannot fire at a unit also across the Blue Foam. If you are on any part of the White
Construction paper, you are in a firing position and the enemy can also fire at
those troops. Finally, any forces on the
drift itself can be fired on and they can fire (as firing is reciprocal).
A player can state his
soldiers are on the white construction paper as sometimes the base hits both
the white and black portions. When on
the white portion they get a minus one for defense. If any soldiers go over the snow drift itself
they move at a rate of broken ground and if vehicles go in they must take a bog
check. Finally, fire against soldiers on
the white construction paper MUST go through the Blue Foam in order to get the
benefit of terrain. If the enemy fires
from the side and around the drift, there is no terrain benefit.
I have used these rules during
two years of gaming with our local players, at a couple of other local
conventions as well as at two Historicons and the snow drift rules have worked
out remarkably well.
Dick Bryant has suggested I
change the black construction paper borders for clear ones so that they are not
opposites (black against white). I am
considering that. While the eye appeal
may be better, it is possible that it is not as apparent where a soldier sits
as well as making it more difficult for those vision challenged (like me) or
from across the table. So at this time
it is under advisement.
NOTE: This
method would work just as well for Desert settings. – Dick Bryant
 |
| Basic Drift |
 |
| Soldiers Hugging the Drift and Able to Fire Over it |
 |
| Soldiers Across a Drift with Smoke ScreenAdd caption |
Sunday, November 27, 2016
THROUGH THE FIELDS
A Chain of Command Game

I have been playing quite a few Chain of Command (CoC) games of late and decided that it was time to report on one. I have been using the maps from some of the scenario books up to now but wanted to try a design of my own and this is the result.

TERRAIN: In this scenario the yellow areas are fields giving light cover. The hedges are NOT hedgerows and provide only light cover but troops further back than 2" from the hedgerow cannot be seen nor fired upon. The grey lines are stone walls and give heavy cover as do the buildings. The white line is a fence giving light cover.
SCENARIO: This will be the Flank Attack scenario from the CoC rule book. The Germans can set 4 Patrol Markers (PMs) within the red dotted line and the US starts 6 PMs, 3 set up on each of the two blue dotted lines. The Germans will place 3 Jump Off Points (JOPs) based on the result of the PM movement and a 4th JOP somewhere within the town. The US as attacker gets free PM moves, the number determined by a D6 roll. The US will place a total of 4 JOPs.
OBJECTIVE: The US objective is to force the Germans off table, either through the loss of Force Morale or by the German player opting to retire.

The US got 2 free PM moves and moved up one PM from each stating point. The following PM moves are shown above with the Germans opting NOT to move any PMs during move 3 - 8.
The final JOP placement was as shown below along with German placement of their two minefields:

FORCES: The US force was a basic Rifle Platoon with a Force Rating of 0 and 10 Support Points. The German force was also a basic infantry platoon with a Force Rating of 0 and 5 Support Points. Both forces started with a Force Morale of 9. The forces:
 THE GAME: The US started by bringing on two Squads, one on each side of the German position.
The Germans placed a unit in Building 5 (Note the numbers on the buildings and terrain pieces are to identify which model they represent for ease of matching a map to the table top).
The two German forces in the building and in the wood are able to bring an effective cross fire against the US Squad in the center. The Jr Ldr with them is kept busy trying to keep the shock down and finally the US has to commit a Sr. Ldr to that force. Just in time, it turns out, as the Jr Ldr. is killed dropping the US Force Morale by 2. The US moves the left hand Squad into the building which can now bring fire into the central woods, though its not very effectively.
The Germans brought their third Squad into building 8 and exchanged fire with the US Squad coming in from the East. That US Squad threw smoke grenades and started a tactical advance across the field. Meanwhile the attrition of the US Squad in the center continued, 2 wounds to the Sr Ldr causing a loss of another 2 points to the US Force Morale. One more loss and they would loose a command die!
The US had to "go for broke" and brought in their tank from the east and their 4th Squad on the west behind building 1. Why not bring in the tank from the southern road, you ask - well the Germans had a CoC die in hand and the US felt that the Germans had a better chance at ambushing the tank if it came in there. In any case the tank was able to bring 75mm fire on to the German unit in the central wood which now had to endure 3 fires! The German commander retreated that unit to the fields behind his initial position.

Now the US was able to move up to the wall in the west in a position to assault the German position in building 5. The Germans used their CoC die to pull back the JOP in the field and started a general retreat toward building 5. It was then that the Germans (Dick White) decided that they was in a no-win situation and retired from the field.
.

 |
| The first Us unit arrives from the East |
 |
| The second US unit arrives from the South |
 |
| German and US forces exchange fire for a phase then the US brought on their third Squad (on the left) and the Germans bring in their second unit in center woods. |
The Germans brought their third Squad into building 8 and exchanged fire with the US Squad coming in from the East. That US Squad threw smoke grenades and started a tactical advance across the field. Meanwhile the attrition of the US Squad in the center continued, 2 wounds to the Sr Ldr causing a loss of another 2 points to the US Force Morale. One more loss and they would loose a command die!
The US had to "go for broke" and brought in their tank from the east and their 4th Squad on the west behind building 1. Why not bring in the tank from the southern road, you ask - well the Germans had a CoC die in hand and the US felt that the Germans had a better chance at ambushing the tank if it came in there. In any case the tank was able to bring 75mm fire on to the German unit in the central wood which now had to endure 3 fires! The German commander retreated that unit to the fields behind his initial position.

Now the US was able to move up to the wall in the west in a position to assault the German position in building 5. The Germans used their CoC die to pull back the JOP in the field and started a general retreat toward building 5. It was then that the Germans (Dick White) decided that they was in a no-win situation and retired from the field.
 |
| The dire straights of the US central Squad, Jr. Ldr dead, Sr. Ldr with 2 wounds, both teams pinned and only 4 shock each away from routing. |
 |
| The final positions |
Monday, June 22, 2015
OPERATION COBRA - A CROSSFIRE CAMPAIGN
OPERATION COBRA - A CROSSFIRE CAMPAIGN
This is a "3-Round Campaign as first devised by Steven Thomas http://balagan.info/ for Cross Fire. the campaign system uses a "ladder" to determine the flow of the campaign between table-top battles.

In the multi-player games that I have run using Cross Fire, I have had the problem of the Side Commander trying, to one degree or another, to run the troops of each player under his command. This is no fun for the subordinate and tends to alienate him from the game. It is also an advantage to a commander whose opponent espouses a fairer approach to his subordinates. To eliminate this tendency among some of my players, I provided a detailed introduction to how I wanted to see the interaction between the commanders and the subordinates to progress and required the CICs to generate a detailed Operations Order for each of his subordinates. See Below:
3 ROUND CAMPAIGN-INTRODUCTION
A 3-round
campaign or a linked scenario campaign can use any historical (or
non-historical, for that matter) action as its basis. The original developer of
the system (Steven Thomas -http://balagan.info/) has used the idea for Kursk, Tarnopol,
The Spanish Civil War (SCW) and other periods. The present version is modeled
for modern conflicts that use Crossfire as the tactical rules but there is no
inherent reason why the concept can’t be used, with proper modification, for anything
from Ancients through WWI.
I am
sticking with the author’s original concept, however, and have chosen the U. S.
breakout from the Normandy lodgement in July 1944. There are plenty of choices
from the breakout that had some 120,000 U.S. troops in 3 Corps to break through
the German lines in what would eventually result in the Falaise pocket and the
drive to the Rhine.
The
operation was called COBRA and began with an enormous carpet bombing in front
of the breakthrough jump off point. Unfortunately some half of the bombs fell
on the U.S. positions killing and wounding many hundreds including General
McNair who had been the main architect of the mobilization and training of the
U.S. Army up to that time.
Though the
30th Infantry Division was one of the main victims of the
Blue-on-Blue and it’s their action that we are going to game, I will ignore the
effects of this tragedy for the sake of simplification.
Page 4 shows
the sequence of scenario-events that make up the campaign. It should be self
explanatory. ED NOTE: This refers to the "ladder" Shown above.
The Germans
have TWO forces, a force to use when on the Defensive (217 points) and one when
on the Offensive (259 points). The American has one force (265 points) which is
used in all scenarios as they are on the Offensive.
The U.S. has
some air assets, while the Germans have some AA gun assets.
The First
game is an American attack vs. a German PREPARED
DEFENSE. The Germans receive 21
points of Defense construction in addition to their regular force. This is the breakout of COBRA toward St.
Gilles the next day after the fatal bombing preparation.
Subsequent
games may require the Defender to mount a HASTY
DEFENSE. Such a scenario requires
that the Defender keep 1/3 (1 complete Company +) off table as a reserve. They
come in on the Defender’s Table edge on any Defender’s initiative on a D6
Roll of 5+. This will be a scenario representing the historical battle at Troisgots.
Finally
there may be the need of a MEETING ENGAGEMENT. In this both sides advance onto the table and
essentially blunder into each other. The battle of Mortain – Hill 314.
Depending on who wins each scenario, there may be additional scenarios that lend themselves to the situation generated by the game "ladder".
Each
scenario will detail the victory conditions for that particular scenario.
ALL the
games will have the same players on a side and the same CIC for the duration of
the campaign. This is to insure a healthy competition to win the campaign.
In playing the games, you
must think of what you are going to do at all times so that you can act
immediately once your side gets the initiative. Make all your moves in a direct
and straight forward manner
ALL MOVES
WILL FIRST BE MADE USING YOUR FINGER TO INDICATE THE PATH AND YOU CAN NEVER
TAKE IT BACK BECAUSE THERE AN ENEMY STAND THAT CAUGHT YOU IN THE OPEN! NO ASKING IF SOMEONE CAN SEE YOU – You have to
decide that yourself based on your understanding of the situation and on what
has transpired before*.
THE MOVE/OR
FIRE MUST BE DECLARED AS GROUP OR INDIVIDUAL BEFORE THE MOVE OR IT WILL NOT BE
ALLOWED AND YOUR SIDE LOSES INITIATIVE!*
NO ONE CAN
TELL ANYONE ON HIS SIDE HOW TO MOVE OR HOW TO SHOOT – WE HAVE PLAYED THIS
ENOUGH SO EVERYONE SHOULD KNOW THE BASICS. BREACH OF THIS WILL COST THE SIDE
ITS INITIATIVE. The talk needed to move
the initiative among the players of a side will not be penalized as long as it is in the gist of " I could use smoke in front of that bunker" "Please support my advance from this wood to that wood" etc., No "Use your HMG in that wood to fire on that enemy stand there!"*.
The side
commander will pass along the side’s initiative to each of his subordinates as
he sees fit. DO NOT TELL YOUR
SUBORDINATES WHAT TO DO WITH THAT INITIATIVE. The operations order (see below)
will tell your subordinates what their mission is. How they accomplish it is
ENTIRELY up to them. So in writing the OPOR be sure to take into account your
knowledge of your subordinates’ strengths and weaknesses in the game and in
tactics. *
The game REQUIRES, If that is not too strong a word,
that the CIC of each side will come up with a written plan and marked maps ( I
will provide enlarged maps for those with weakened eye-sight and a list of the
acceptable Map Symbols to be used. DO NOT show them where they should place their troops or their defensive items.* It also REQUIRES that each CIC provide a
written OPERATIONS ORDER for each of his subordinates with a copy to me. Without these the game cannot progress.
INITIATIVE
Initiative starts with the attacker, whomever that may be. All players on a particular side can move within his Company Sector or they can move one-by-one. When one player on a side loses his iinitiative it goes to another player of the CIC of that side as directed by the side's CIC. When that player loses his initiative, then all 3 players on the side has lost theirs and the initiative switches sides. No player may have more than one initiative in a row unless gained by his own actions. The CIC may loose his initiative if he doesn't use it before the 3 players on his side loose theirs.
*These address the problems that I have encountered in running games with a side commander and several subordinates.
AIRCRAFT AND AIR SUPERIORITY IN CROSSFIRE
We are using the rules devised by Steven Thomas at http://balagan.info/aircraft-and-air-superiority-in-crossfire modified by me. My modifications are that the Typhoon has only 4 Pairs of rockets and 2 hmg.
The US had a pre-planned bombardment of 18 rounds ( see Optional Rules in Cross Fire) and it was somewhat effective costing the Germans on the US right several squads and the Germans on the US left the FO for their 81mm mortar. This was followed by an air strike that was ineffective except for pinning a couple of squads.
Another sweep of US air power netted no results except for a couple of pinned stands. Dick White was expending a lot of smoke trying to get his platoons unpinned and unsuppressed. He sent in an engineer squad to deal with the mines, but it was killed outright giving the initiative to Dick Bryant.
Dick Provided more smoke cover to his left and charged the German unit with the suppressed sqd in the center. In spite of the suppressed stand, Jack Breen's unit won the melee and and the initiative passed to Rick on the left. Rick pushed A company's 2nd Platoon into the center wood driving out the Germans. He then brought one of the tanks assigned to him by the Btn Commander, Dick White. It promptly found a mine field and brewed up, Initiative to the Germans!
The Germans essentially held their positions, trying to cause as many casualties as possible among the Americans. In this they were successful but some attempts at moving and and unpinning eventually lost them the initiative and it was back to the US. The Btn CO, in charge of the Company on the US Right attempted to force an opening in the enemy to his front with one of his tank reserves and promptly lost it to Panzershreck fire. In the center Dick Bryant moved his reserve Platoon up to the wall and decimated the German platoon to his front with rifle fire until he lost his initiative.
The US Btn Commander decided that the best chance for a win was on the left and sent the remaining Tanks over to Ricky on the left. He advanced a tank up to the left of the orchard where it was destroyed by a Panzerschreck! Initiative to the Germans.
The Germans used their initiative in trying to get some help to their right but lost the initiative in doing so. The US opened up with a third pass of air power, but had the Aircraft shot down!
The Germans, on the left had lost two platoons but were still holding out with a platoon and a HMG. The US Force there was essentially out of smoke and was hesitant to move across the no-man's land between their position and the objectives.
A few more turns were played but the US conceded as they felt that they didn't have the strength to take enough of the objectives to make up for their lost victory points. They had lost 3 tanks, 1 Aircraft and 7 stands for a total of 24 points. The Germans lost 11 stands for a total of 11 points.
As this was a German win, the next battle will also be an American attack into a prepared German Defense. Reinforcements for both sides have arrived, but are mostly Green, Will the US find the right formula to win the next battle, Stay tuned......
INITIATIVE
Initiative starts with the attacker, whomever that may be. All players on a particular side can move within his Company Sector or they can move one-by-one. When one player on a side loses his iinitiative it goes to another player of the CIC of that side as directed by the side's CIC. When that player loses his initiative, then all 3 players on the side has lost theirs and the initiative switches sides. No player may have more than one initiative in a row unless gained by his own actions. The CIC may loose his initiative if he doesn't use it before the 3 players on his side loose theirs.
*These address the problems that I have encountered in running games with a side commander and several subordinates.
OPERATION ORDERS simplified for war gaming contain:
1. SITUATION
a. Enemy forces.
Possible strengths
Probable course of action
Most dangerous course of action
b. Friendly forces. (Your subordinates force available to complete his mission)
c. Attachments and detachments. (Attached armor, artillery, etc.)
d. Position and identity of friendly forces to either flank or rear.
2. MISSION
a. Who (which, if not all, of his force must be applied to the mission), what (defend, attack, support),
b. Where (the actual objective(s), When (if there is any delay, etc.).
b. Where (the actual objective(s), When (if there is any delay, etc.).
3. EXECUTION
Intent
a. Concept of operations.
(1) Maneuver
(2) Fires
(3) Reconnaissance and Surveillance
(4) Intelligence
(5) Engineer
(6) Air Defense
AIRCRAFT AND AIR SUPERIORITY IN CROSSFIRE
We are using the rules devised by Steven Thomas at http://balagan.info/aircraft-and-air-superiority-in-crossfire modified by me. My modifications are that the Typhoon has only 4 Pairs of rockets and 2 hmg.
USING COMPANY SECTORS IN CROSSFIRE
These are dervived from concepts sent me by Arty Conliffe, the author of Cross Fire and from a later posting, Blagan's "Planned Zones" http://balagan.info/how-to-play-multi-player-crossfire-games#Planned_Zones.
Company Sectors
Historically, all units in WWII used delineated sectors to set up an organizational boundary between companies and we can use them to allow multi-player games of Cross Fire. Since we have 3 companies per side in this campaign, there will be 3 sectors allowing the entire game to be played as if there were 3 separate games, but tied together.
Company Sector Assignments
Company Sector assignment is part of each side's battle plan. The Side Commander, Battalion Commander in this campaign, assigns each of his Company commanders a sector for his operations, his forces, supports and mission by the use of the Operations Order, described above. The sectors are drawn on the map and should use features that are readily identifiable on the table to delineate them. Sectors may not overlap other friendly sectors.
Sector Fire
Troops in one sector may fire into another sector to support, but since their main objective is in there own sector, most of their fire will be in their sector.
Movement Between Sectors
There are only 2 times that a Squad may move out of its own sector. One is to perform a Close Combat after which it must either remain stationary, only pivoting in place, or to return to its own sector. The other is if a "defending Line" was a part of the sector. In this case the unit may "counter attack across the defending line for a Close Combat as above.
Forward Observers
They must stay in the sector to which they have been assigned but may observe targets outside their sector.
Reserve Units
Reserves may be kept by the Btn. Commander(Side Commander) or a local reserve may be kept off board as a Local Reserve by each Company Commander. The Local Reserve is part of the company and can move in its Sector when ever desired. The Btn. Reserve can be assigned to any sector by the Btn CO when ever and wherever he desires. It comes under the purview of the Company Commander and can thus move within his assigned sector.
BOTH SIDES RECEIVED THIS BRIEFING:
3-GAME CAMPAIGN
OPERATION COBRA – THE NORMANDY BREAKOUT
FIRST
GAME – THE BATTLE FOR SAINT GILLES
The first game is an American attack
against a German PREPARED DEFENSE.
The US has a PRE-PLANNED BOMBARDMENT as per
the advanced rules of CROSS FIRE. They
have a number of Fire Missions (FM) BEFORE the game they have selected terrain
features (hills, woods, fields, buildings, Bunkers, hedges, etc. that they
suspect may hide German units.
1 D6 is rolled for each FM:
A “5” Suppresses a Squad, A “6” Kills a Squad; If in a
building or a Bunker, a “6” is required to Suppress.
Two successive Suppresses Kills a Squad. The Owning player determines which squads are
hit but cannot spread hits around multiple stands in one area. Any successive attacks are against the same
squad until killed.
The Germans use the “Defensive Army” for this
scenario.
The Germans have 21 additional points for mine
fields, bunkers, wire entanglements, and emplacements. See your Army sheet for
point cost of various emplacements.
The Germans place first, NOT HIDDEN,
AFTER the PRE-PLANNED BOMBARDMENT. The US places SECOND, also NOT HIDDEN.
OBJECTIVE: There are 6 objectives, 1
Minor (a) and 5 Major (A,B,C,D and E). (See Map). The attacker, before the game,
may secretly elevate ONE of the major
objectives to VITAL.
Objective values:
Minor: 2
VP
Major: 4
VP
Vital: 8
VP
1 VP for ea. German sqd, Hvy Wpn, CC or
BC killed at game end
2 VP for ea. German AFV destroyed at
game end
-1 VP for ea. US sqd, Hvy Wpn, CC or
BC killed at game end
-2 VP for ea. US AFV/Aircraft destroyed
at game end
We will not carry casualties from one
game to another. Rather some of your forces( the number determined by casualty
percentage) will downgrade to GREEN as the casualties are being replaced by
less well-trained personnel.
.
THE FORCES AVAILABLE
| US ATTACK FORCE - 265 POINTS | |||||||
| Leg Btn. (Regular) | |||||||
| Btn HQ | |||||||
| 1 BC (+1) | 6.00 | ||||||
| 1 SMG | 2.50 | ||||||
| Btn Hvy Wps | |||||||
| 2 HMG | 12.00 | ||||||
| 1 81mm W/12FM | 6.00 | ||||||
| 1 57mm AT Gun w/truck | 3.00 | ||||||
| 3 Infantry Companies EA. W/ | 141.00 | ||||||
| 1 CC(+0)* | 4.00 | ||||||
| Coy Hvy Wps | |||||||
| 1 60mm W/12 FM | |||||||
| 1 HMG | |||||||
| 3 Rifle Platoons ea. w/ | |||||||
| 1 PC(+1) | |||||||
| 3 rifle Sqds | |||||||
| Equip 1 Sqd in ea Company with Bazooka | 6.00 | ||||||
| * CC of A company +2, others +0 | |||||||
| Engineer Assault Platoon (-) | |||||||
| 1 PC(+2) | 2.00 | ||||||
| 3 Eng. Sqds | 10.50 | ||||||
| Assault Bonus pts. | 4.00 | ||||||
| 2 75mm Howitzers W/12FM | 12.00 | ||||||
| 5 Sherman/76mm | 45.00 | ||||||
| 1 Aircraft Support | 20.00 | ||||||
| total | 265.50 | ||||||
| ELEMENTS OF THE PANZER LEHR DIV. DEFENSE FORCE - 217 POINTS | ||||||||
| Leg Btn. (Regular) | ||||||||
| Btn HQ 1st Btn, 902nd Rgt, 130th Pz Lehr Division* | ||||||||
| BC (+2) | 6.00 | |||||||
| 3 SMG + PC(+0) | 7.50 | |||||||
| 1 Sniper | 1.00 | |||||||
| 3 Infantry Companies EA. W/ | ||||||||
| 1 CC(+2) | 180.00 | |||||||
| Coy Hvy Wps | ||||||||
| 1 HMG | ||||||||
| 1 120mm W/10FM | ||||||||
| 1 81mm W/12FM | ||||||||
| 3 Rifle Platoons ea. w/ | ||||||||
| 1 PC(+1)* | ||||||||
| 2 rifle Sqds | ||||||||
| 1 sqd w/Panzerschreck(early) | ||||||||
| Equip 1 Platoon in ea Company with Panzerschreck(early) | 22.50 | |||||||
| * 1ST Platoon PC =+2, others = +1 | ||||||||
| If in prepared defense add 21 fortification points: 4 sqd bunker = 4.5 pts; 3 sqd bunker = 3.5 pts; 2 sqd bunker = 2.5 pts; 1 sqd bunker = 1.5 pts. Mines ( 4" long or 1 feature) = 2pts; wire (4" long) = 0.5 pts. | ||||||||
| * Figure stands may be identified with different unit designations | ||||||||
 |
| Boundary Lines as selected by both sides |
THE BATTLE
 |
| The Battle for Ste Giles NOTE: The 75mm Observer shown in the US center is in error, there was none and I am too lazy to change the map! |
B Company (US Right0 advanced under heavy fire, their 2nd Platoon becoming pinned down in the wood just at the German set on line. B's 3rd platoon managed to get into the house to the left of the 2nd platoon but soon had a sqd suppressed and the others behind the house with no place to go. The 1st Platoon was initially held in reserve. The German Cpt. Seamens' deft use of mine fields and barbed wire stopped the US cold in their attempt to reach the objectives A and D to their front.
 |
| The Us position on the Right. B/2 is pinned in the wood and B/3 is in the house but suppressed. |
That Suppress moved the initiative to the US Left where Rick Bryant pushed quickly into the wood and fields near the German set-on line then passed the initiative to Dick Bryant in the center. Dick moved up to the wall to his front and into the woods on his left Sector line to set up the 75 to command the road. Fire from the German 2/10 Platoon in the field to the front of the US advance suppressed an inf. sqd. in the wood and the initiative passed to the Germans.
 |
| Rick Bryant moves up on the US Left. |
 |
| Dick Bryant's US Central position. Note his suppressed infantry in the wood. But he got his own back by suppressing a German stand in the field to the front. |
The Germans attacked on their Right, but managed to loose most of the platoon in the orchard. In the center the Germans and US exchanged fire with Dick Bryant getting the worst of it, loosing his HMG and most of the platoon in the wood. Well directed mortar fire from the German Right under Mitch Abrams added injury to the insult! Dick was expending most of his smoke rounds to protect the advance of Ricky's forces on the left.
Another sweep of US air power netted no results except for a couple of pinned stands. Dick White was expending a lot of smoke trying to get his platoons unpinned and unsuppressed. He sent in an engineer squad to deal with the mines, but it was killed outright giving the initiative to Dick Bryant.
 |
| US air arrives for its 2nd sweep pinning a stand of Germans |
The Germans essentially held their positions, trying to cause as many casualties as possible among the Americans. In this they were successful but some attempts at moving and and unpinning eventually lost them the initiative and it was back to the US. The Btn CO, in charge of the Company on the US Right attempted to force an opening in the enemy to his front with one of his tank reserves and promptly lost it to Panzershreck fire. In the center Dick Bryant moved his reserve Platoon up to the wall and decimated the German platoon to his front with rifle fire until he lost his initiative.
The US Btn Commander decided that the best chance for a win was on the left and sent the remaining Tanks over to Ricky on the left. He advanced a tank up to the left of the orchard where it was destroyed by a Panzerschreck! Initiative to the Germans.
 |
| US looses a third tank! This time to Panzerschrek fire |
 |
| US Loses its air cover |
The Germans, on the left had lost two platoons but were still holding out with a platoon and a HMG. The US Force there was essentially out of smoke and was hesitant to move across the no-man's land between their position and the objectives.
A few more turns were played but the US conceded as they felt that they didn't have the strength to take enough of the objectives to make up for their lost victory points. They had lost 3 tanks, 1 Aircraft and 7 stands for a total of 24 points. The Germans lost 11 stands for a total of 11 points.
As this was a German win, the next battle will also be an American attack into a prepared German Defense. Reinforcements for both sides have arrived, but are mostly Green, Will the US find the right formula to win the next battle, Stay tuned......
Sunday, May 3, 2015
A Franco-Prussian Wargame
A FRANCO-PRUSSIAN WARGAME
CHASSEPOT AND NEEDLEGUN
Chassepot and Needlegun is a "old style" miniatures wargame written by Larry Brom in the 1980s. I have always enjoyed the "feel" of the game and have played it for years. The members of Kingston Irregulars, being of a newer generation of wargamers don't quite see the same appeal that I do. Having borrowed Bob Beatties's 15mm figures on extended loan, I finally convinced them to try another outing of the rules. Of course being the only member who knows them and has had more than 1 or 2 games with them, I ended up designing the scenario and umpiring the game -so I still didn't get to play. I might get one more in before returning the figures to Bob at this Historicon!
As most of the club had little or no experience with the rules, I wrote the scenario and placed both armies on the board at start.
 |
| The Prussian set on is the red line, the French set on is the blue. |
The scenario is entitled "On The Road To Paris". Each side was given a scenario description as follows: (Someday I am going to figure out how to hold the tab positions when I copy from Word for Windows to the Blog!!).
THE ROAD TO PARIS
FRENCH ARMY
You have been tasked
with holding the crossroads at Maison-Boutain. The command knows that your
force is very much depleted and the Boche are very strong. We are sending you
what help we can - the Garde is en-route. But their march is a long one and you
must delay for the life of France! Note that The Guard Mobile and the Algerians
are green troops at best (Listed as “other” in the rules)
Your
force: #
Stands
General
Commanding (Major General) (Jack Breen) 2
GUARDS
BDE
Commander (Bd. General) (Steve Myers) 1
1st Guards
Commander ( Col.) 1
1st Grenadier Btn 6
2nd Grenadier Btn 6
1st Chasseurs
Commander ( Col.) 1
1st Btn 6
2nd Btn 6
2nd
BRIGADE
Bde Commander (Bd. General) (Jack Breen) 1
1st Inf Rgt
Rgt Commander (Col.) 1
1st Inf Btn 6
2nd Inf
Btn 6
3rd Inf
Btn 6
2nd Inf Rgt
Rgt Commander (Col.) 1
7TH Inf
Btn 6
20th
Inf Btn 6
1st
Garde Mobile Btn (other) 6
1 Btry 4# Guns 3
ALGERIAN
BDE
Bde
Commander (Bd. General) (Dick Messier) 1
Algerian Rgt
Rgt
Commander (Col.) 1
1st
Btn, Algerians (other) 6
2nd
Btn, Algerians (other) 6
2nd Rgt
Rgt Commander (Col.) 1
1st Btn
Zouaves 6
2nd Btn
Zouaves (Francs Tireurs used as zouaves) 6
3rd BRIGADE
Bde
Commander (Bd. General) (Gene Tower) 1
1st Rgt
Rgt Commander (Col.) 1
1st Btn Marines 6
2nd Btn Marines 6
2nd Rgt
Rgt Commander (Col.) 1
3rd Btn Marines 6
4th Btn Marines 6
MITRAILLEUSE
Btn
2 Btry Mitrailleuses 6
TOTAL 131
STANDS
THE ROAD TO PARIS
PRUSSIAN ARMY
The French are on the
run. Enemy forces to your front are very weak, though reports of troop
movements to their rear are coming in with every messenger. Push through with
all speed take the crossroad and send the French reeling back before they can
muster any more strength.
Your
force: #
Stands
General
Commanding (Major General) (Dick White) 2
GUARDS
BDE
Commander ( Bd. General) (Rick Bryant) 1
1st Guards
Commander (Col.) 1
1st
Prussian Gd Grenadier Btn 6 2nd Prussian Gd Grenadier Btn 6
1st Jaegers
Commander (Col.) 1
Prussian Jaeger
Btn 6 Gd Shutzen Btn
(Jaeger) 6
6# Krupp Battery 3
1ST
BDE
Bde Commander (Bd. General) (Dick White) 1
Prussian Rgt
Rgt Commander (Col.) 1
1st
Btn, 29th Prussians 6
1st
Btn, Colburg 6
1st
Btn, Hesse Damstadt 6
Saxon Rgt
Rgt Commander (Col.) 1 1st
Btn,Saxon 4th 6
2nd
Btn, Saxon 4th 6
1st Btn
Saxons 6
2nd Btn
Saxons 6
6# Krupp Battery 3
WURTEMBURG
BDE
Bde
Commander
Rgt
Commander(Col.) 1
1st
Btn, 5th Bavarians 6
2nd
Btn, 5th Bavarians 6
2nd Btn, Silesian Jaegers 6
Wurtemburg Rgt
Rgt Commander (Col.) 1
1st
Btn, 7th Wurtemburgers 6
2nd Btn, 7th
Wurtemburgers 6
3rd Btn, 7th
Wurtemburgers 6
4th
Btn, 7th Wurtemburgers 6
6# Krupp Battery 3
TOTAL 128 STANDS
NOTE: though the two sides seem to be equal in size, The French have 3 Btns of "other troops" with a lower morale which makes each of them about equal to 1/2 a normal Btn. and the French reserve, The Guard arrives late - they came in on the 3rd turn. which make the French Number of stands about 99 stands vs Prussian 128 for the first several moves of the game.
 |
| The Initial Set-up |
 |
| A schematic map of the original set-up |
Despite the rifle and Mitrailleuse range advantage and having the mission of "holding the crossroads", the French gave up that initial advantage and advanced into the Boche. See Below:
 |
| Both sides advance, the French giving up their range advantage! |
The Right Flank of the French shows the first signs of problems and its early times yet!
 |
| The French advanced left flank. Note the TWO Btn. in rout hiding behind the village. |
 |
| The French Right flank. One Btn. of Zouaves has routed to a position beside the wood, hoping to rally. The French guns at the top of the photo (left) have already lost a gun and the Algerians on the bottom left of the photo have managed to move out of command radius! |
Subscribe to:
Posts (Atom)